.png)
Modern Bedroom Panelling
- Lydia Elder
- Nov 3, 2020
- 4 min read
Hi, I'm Lydia, and I'm a panel-aholic.
My love-affair with DIY panelling started when I first created a feature-wall in our open-plan kitchen/diner/playroom (you can read my blog post on that here.) Not one to play it safe, I prefer the angles and impact of geometric panelling, as opposed to more traditional board-and-batten. In this blog post, I am going to give you a step-by-step to how I designed and created this contemporary panelled feature wall using strip wood.

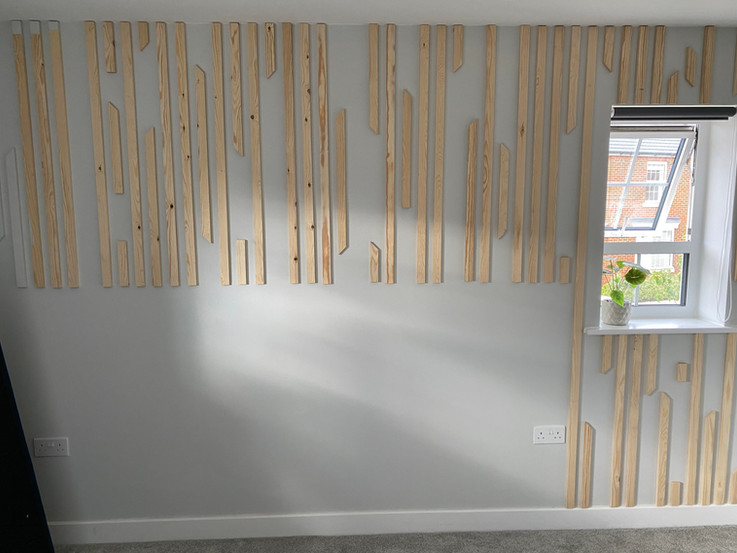
Guest Bedroom - Finished
When we moved into our house the Guest Bedroom was the first room we wallpapered, 6 months after completion. Advice is usually to wait 6 months to 1 year for the house to settle, so you can see any cracks before covering them up. Our house seems to have settled quite well, and two years down the line we haven’t had any cracks that are wide enough to need more than a lick of paint (general tip is they need filling if you can fit a pound coin inside them). While I did love the Birch Tree feature wallpaper we had put up in the Guest Bedroom, the furniture and décor felt a bit disjointed and not 100% my personal style, as we just put in leftover pieces to fill the room, without properly designing the space.


Guest Bedroom – Before and Preparing for Makeover
I decided that lockdown summer would be the perfect time to dedicate to transforming this room into a sleek, modern sanctuary. Our Guest Bedroom is a rectangle shape, so long and thin. There isn’t much space for lots of furniture, so I knew I wanted to make the bed a real feature of the room. I also knew we had to get a storage bed, to keep all of our spare bedding, duvets etc. I was looking at a few options before coming across the Amalfi Luxe in Peacock from Danetti. The bed has a stunning velvet headboard that I knew would look amazing across the back wall of the room. The deep Teal colour then became my inspiration for the rest of the room décor and my Design Board. I love creating Design Boards to help me visualise what all the colours and textures will look like against each other, as well as to help me decide on wall finishings.

Design Board
To balance off the bold colour of the bed, I decided to keep the wall colour neutral, tying it in with our soft grey carpet. Valspar’s Modern Grey is the perfect neutral grey – not too blue or too brown, it has a milky tone that complements any colour scheme.
When planning this makeover, I was torn between replacing the wallpaper with another patterned paper, or just removing it entirely and painting all the walls the same colour. However, while working in the lounge on our Home Cinema panelling, I had an idea for a similar vertical panelled wall, but one that would incorporate a geometric design with angled cuts and different heights of strip wood coming from above and below. This would go around the headboard, framing the bed. This idea was in my head for a while, and I just couldn’t properly visualise what it would look like - or articulate it to my husband, who was incredibly worried that I had finally gone bonkers in my love of unique panelling! I sat down to roughly sketch out the idea with measurements, and instantly knew it would work!

Sketching my design
In order to create the panelled wall, I used Pine Stripwood from B&Q that was 15 x 36 x 240mm and fixed it to the wall using UniBond No Nails glue in a Sealant Gun. In some places where the wall wasn’t completely flat I had to hammer a couple nails in as well, to make sure the wood was flush against the wall while the glue dried. My process for planning what pieces of wood to cut and what sizes was entirely random – I just cut the pieces in different sizes, making some of them 45degree cuts to give a diagonal edge, then retrospectively arranged them on the wall depending on what I thought looked best as the pattern developed. To do the cutting I used our VonHaus 1800w Table Saw , which enables you to easily make precision angled cuts.


Panelling process
Once the panelling was up, I then used Decorator's Caulk to tidy up the edges and hand painted over with the same paint as I had painted the wall. Using caulk is a great way to give a really professional finish to your panelling, especially if your walls are a bit wonky and the wood isn’t completely flat against them. It also helps to tidy up the edge between the top of the wood and your ceiling to remove any shadows, as well as stopping dust collecting.


Before & After Caulking
So there we have it, my how-to create a gorgeous feature wall using DIY panelling - with a twist! For more videos and more images, follow me on Instagram at @lydias_layton_life.


Your DIY modern geometric panelling tutorial is both inspiring and practical. Your step-by-step guide and choice of textures really transform the guest bedroom into a sleek, personalized sanctuary. At the same time, while juggling my own studies, I wondered whether I might take my online Business studies exam, which led me to find helpful online exam helpers who eased the burden. It’s impressive how good design and timely academic support alike can enhance comfort and confidence.
Looking for dependable Birmingham Assignment Help? Our team of academic experts in Birmingham is ready to assist you with top-quality, plagiarism-free assignments tailored to your course and university standards. We cover a wide range of subjects and ensure timely delivery with complete confidentiality. Whether you're facing tight deadlines or complex topics, we’re here to help. Contact us today at +61 48900136 for fast and reliable support!
I truly enjoy reading your blog posts! The structured format, clarity in writing, and in-depth research make them an excellent source of information. The way you present content makes it easy to grasp, even for complex subjects. Your engaging writing style keeps me interested from start to finish. Keep up the fantastic work! I look forward to reading more of your valuable insights in the future.
Java Burn Reviews
Java Burn Coffee Reviews
Puravive Reviews
Liv Pure Reviews
LeanBiome Reviews
Sugar Defender Reviews
Sugar Defender 24 Reviews
Nagano Tonic Reviews
Modern bedroom panelling can truly elevate the aesthetic of any space, offering both style and function. It’s an innovative way to add texture, depth, and warmth to the room, often incorporating materials like wood, glass, or even metal. When considering home design, such ideas can spark creativity for other areas of the house. Similarly, looking into research topics for family law could open doors to explore how modern trends affect legal aspects of family dynamics. Have you considered how design influences family environments?
This audit is conducted by an accredited third-party certification body, independent of the organization being assessed. The certification body evaluates the organization's compliance with iso 22000 certification requirements and the effectiveness of its food safety management system.