.png)
DIY Geometric Panelling
- Lydia Elder
- Sep 13, 2019
- 5 min read


Panelling has made a huge comeback in the last couple of years, and not just traditional square board and batten. I’d been wanting to create a contemporary geometric panelled design in my home and thought that the main wall in our kitchen-diner would be the perfect place for a feature. Being a new-build house, everything is a blank, white canvas and initially panelling seemed like a huge, complicated job. However, with the right tools and preparation, a panelling project can be really straightforward, even for amateur DIYers (like me!). In this post I am going to list all the quantities and prices of materials I used, and give you some top tips on how to create geometric panelling.

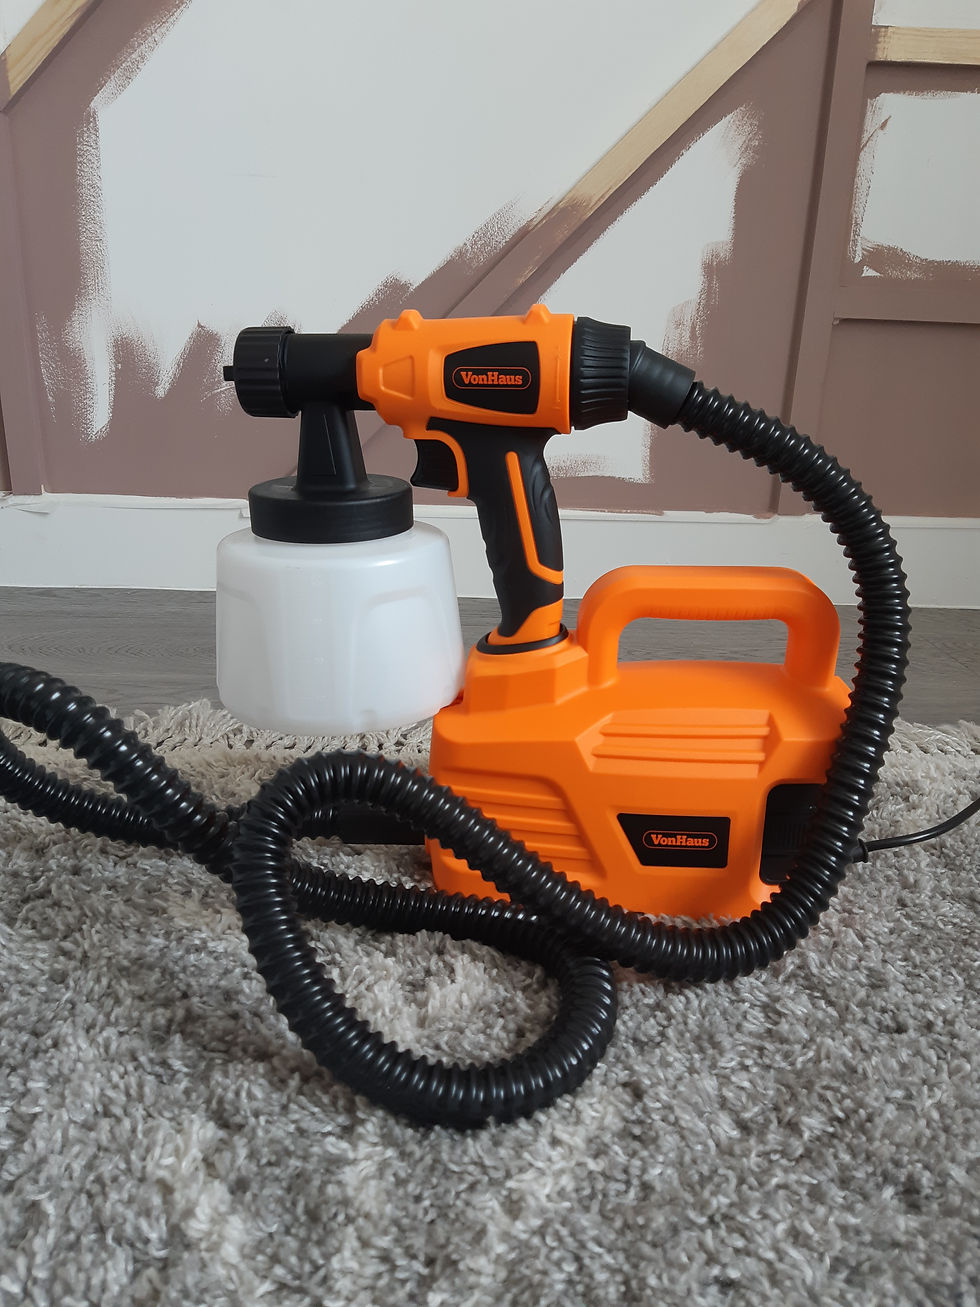
Above are all the materials I needed for the actual panelling. On top of that, I bought one 2.5l tin of Decorating Centre Online’s Colour Match Hardwearing Matt paint, in Farrow & Ball’s Sulking Room Pink, already owned a Combination Square ,and was gifted a 1800w Table Saw and 800w Paint Sprayer by the home of homeware, VonHaus. More on that later!

First Step - Measuring Up
The most important step for us was properly planning out our design and drawing it out on the wall before purchasing the materials. This meant we made multiple trips to the shops, but it was worth it as actually placing the panels was much easier. Firstly, we bought one piece of stripwood and cut the end to the 45 degree angle we were basing the design off of (you can increase or decrease the angle depending on how steep you want your panel lines to be, but all 45 degree angles is the most straightforward way to do it!). We used that piece of wood to draw the outline of the pattern we wanted. My husband then measured all the bits we had drawn to figure out how much stripwood we would need to buy.


Next Up - Angle Cuts
I approached VonHaus to see if they wanted to collaborate with me on this project, as I was determined to up my DIY game and get to grips with some serious power tools. I am so grateful to them for sending me the table saw, which made cutting the 45 degree angles we needed into a quick, painless and actually fun task! Now, if you don’t have an electric saw, you can use a combination square to measure and mark the angle, then cut using a hand saw – it will take longer but will achieve the same result. I still used the combination square to measure and draw the angle on my pieces of wood, so that when I was cutting with the saw I had a line to follow.


The Time Consuming Part – Attaching the Stripwood
On the recommendation of @insidehouse100 (stunning Interior Instagram account, go check them out!), I decided to use Unibond No Nails to stick the stripwood to the wall, rather than use a nailgun to attatch. This was half driven by laziness (I didn’t want to have to fill in the nail head holes before painting) and half by a desire to keep costs down. We applied the glue to the back of the wood using the Cartridge Gun, and laid it over the top of our stencilled lines. This is where we realised that our new-build house did not have flat walls. We have already discovered that none of our floors or ceilings are straight, however the convex nature of the wall meant that we had a few moments of blind panic seeing the stripwood just ping back off instantly when we tried to let go of it. I sent out an SOS to @insidehouse100, and he reassured me that the glue would work, you just had to push the panelling very firmly against the wall for up to ten minutes. That was when I went off to make lunch and left my husband to it!

Caulk, Baby Caulk
I’d never heard of this word before I embarked on this project, and I can’t get enough of it! The purpose of caulking is to fill and smooth any gaps between the stripwood and the wall, to give that properly built-in, finished look. Pop the caulk tube into the cartridge gun, and pump the trigger until the caulk begins to come out. Every time you stop pumping, you need to depress the pressure-relief trigger and wipe the tip. The best way to caulk with a smooth line is to start at the top and move the gun towards you, without hesitation, to avoid getting blobs. Again, remember to depress the pressure-relief, and wipe the tip! Use your finger to lightly run down the line of caulk you have just created, creating a concave surface.
Painting – The Home Stretch!
The final part of creating a beautiful geometric panel feature wall is to paint the entire thing! Before it is painted, it’s really hard to visualise what the wall will look like, and I did find myself fearing I’d created some mock-Tudor monstrosity. However, once the paint is on, the magic happens and the stripwood completely blends into the walls, making it hard to tell what is attatched to where. To again make the project even easier, I used a paint sprayer, but first I went around the edges with a brush so that I didn’t have to spray too close to adjacent walls or the ceiling. My one word of warning if that you have to cover EVERYTHING. Turn your room into a Dexter-style kill room (I joke, I joke…really hope you all get that reference and don’t think I’m a psychopath!). We didn’t quite get this right on first use and I was frantically wiping the skirting board with a wet wipe and had to repaint a bit of the ceiling afterwards! Using the sprayer was THE most satisfying part of the project – the paint seemed to melt onto the wall and it gave perfectly even coverage. The sprayer I used is only £34.99 from VonHaus (it was gifted to me, but I would 100% have bought it), and was also incredibly easy to clean afterwards, which I was dreading slightly.


There you have it! A step-by-step guide to creating this geometric panelled feature wall. I’m already thinking about my next panelling project, as they add texture, detail and depth to the room in a way that wallpaper or paint alone just can’t.
I have to mention that before undertaking this, I was hugely inspired by @angelarosehome and the feature wall she created for her son’s bedroom, as well as all the tips on her Instagram stories. I’ve complied her and other geometric panelled wall images on my Pinterest Board here. For many more videos and ‘behind-the’scenes’ of our DIY panelling project, please follow me on @lydias_layton_life . I would LOVE to be tagged in any of your own panelling projects, if I’ve inspired you!


https://keonhacai55.app/ dạo này mình thấy mọi người nhắc nhiều nên cũng tò mò vào nghía thử cho biết. Mình không phải dân cá cược gì đâu, kiểu vào xem cho vui thôi, mà thấy trang này hiển thị kèo khá dễ hiểu, có kèo châu Á/châu Âu với tài xỉu đặt cạnh nhau nên nhìn một phát là nắm được. Mình cũng thích cái cách họ để lịch thi đấu khá nổi, lướt xuống chút là thấy ngay hôm nay có trận nào, khỏi phải bấm qua lại nhiều. Giao diện nhìn gọn, chữ với bảng kèo không bị rối mắt, mấy khối thông tin tách ra rõ ràng nên xem trên điện thoại cũng ổn. Nói chung mình vào…
https://taixiuonline.ink/ thấy bạn bè nói suốt nên mình cũng ghé thử cho biết. Vào rồi mới thấy trang này làm kiểu đơn giản, không vòng vo, chủ yếu xoay quanh Tài Xỉu thôi nên đọc đỡ bị loãng. Mình lướt qua phần tổng hợp top game uy tín 2026, kiểu gom lại một chỗ nên ai muốn xem nhanh mặt bằng chung chắc sẽ thích. Có đoạn nói về mấy phiên bản Tài Xỉu như kiểu truyền thống với loại có mã kiểm chứng, đọc cũng dễ hiểu chứ không nhồi chữ quá nhiều. Nói chung cảm giác nội dung viết thẳng, hợp người muốn nắm ý chính nhanh. Giao diện nhìn gọn, tiêu đề và các khối bài Tài…
alo88 bet mình thấy dạo này hay được nhắc nên tò mò bấm vào thử cho biết thôi. Vào trang cái là mình để ý ngay phần menu nằm khá dễ nhìn, nên chuyển qua lại giữa các mục không phải mò lâu. Mình cũng không đọc kỹ nội dung hay gì, chỉ lướt xem cách họ bày thông tin trên màn hình thôi mà thấy ổn, kiểu chia khối rõ ràng nên nhìn không bị ngợp. Mấy phần chính được tách ra gọn gàng, cuộn xuống vẫn theo mạch nên không có cảm giác rối. Nói chung mình thích kiểu giao diện đơn giản vậy, nhìn phát hiểu luôn mình đang ở đâu. Điểm mình thấy tiện nhất vẫn…
alo88 bet dạo này mình lướt thấy nhắc hoài nên cũng tò mò bấm vào xem thử giao diện thế nào. Mình chỉ xem qua kiểu “ngó nhanh” thôi chứ không đào sâu nội dung, chủ yếu để ý cách họ sắp xếp trang. Cảm giác đầu tiên là bố cục nhìn khá thoáng, các mục chính được tách ra rõ nên không bị rối mắt. Cái mình thích là thanh menu để ở chỗ dễ thấy, chuyển qua lại vài trang cũng nhanh, không phải mò lâu. Nói chung nhìn kiểu gọn gàng, dễ hiểu, hợp với ai chỉ muốn vào xem nhanh rồi tự khám phá tiếp. Mình thấy họ chia khu vực nội dung thành từng khối…
kuwin.com mình thấy hay được nhắc lướt qua trong mấy cuộc bàn luận về giải trí online nên tò mò ghé thử để xem giao diện họ làm thế nào. Mình không tập trung soi từng trò hay tính năng, mà để ý cách trang chia mục và dẫn người dùng đi qua các phần như thể thao, casino, game bài, slot. Nhìn chung bố cục khá dễ theo dõi, các khối nội dung tách bạch nên đọc nhanh cũng không bị rối. Với mình, chỉ cần điều hướng rõ ràng và thông tin trình bày gọn là đủ để nắm tổng quan ban đầu.